
This post updated on January 13, 2021
Donated to Ride With Rouge
to support the Kids Cancer Care Foundation of Alberta.
to support the Kids Cancer Care Foundation of Alberta.

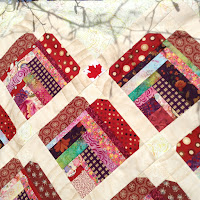
Having some nice odd blocks in my stash that I wanted to use up got me thinking about how I could lay them out in a pleasing, simple way for a charity quilt project.
I also had a huge pile of 2 1/2" Strips and they worked beautifully as a setting background for the odd blocks. When I am done working on a new quilt I will often cut the remnants of fabric into these strips for future use. Keeping these in 2 bags, one with warm colors and one with cool colors keeps them ready for my next scrap quilt. Here is the Warm & Cool Color Demo.
For this quilt I used the warm colors. The gray neutrals worked because of the warm undertones.

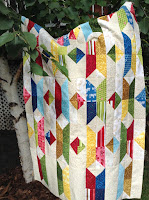
This completed top is approx. 60 x 60".
Printer-friendly PDF of this pattern available here:

Start by adding a neutral border to your odd block
with enough fabric that you can trim it to 12 1/2"
Note: This lovely gray fabric was one of my husband's shirts that was almost brand new. He didn't like it. Normally I would not recommend used clothing for quilts, but when the fabric is still very new it is a good recycle idea. Make sure it is 100% cotton.

Use small pieces of painters tape to mark off your 12 1/2" size.
Trim your blocks, being sure to centre them in your border.

My quilt used 6 blocks, but you can easily use any number that you have.


After you have pairs of strips, divide them into 3 even lengths and
sew them together until 6 strips are joined.

Next, lay out your odd blocks on the floor or a design board in a pleasing pattern, imagining your strips in between. Keep in mind the finished quilt size that you desire when you do this.

Measure the length in between your blocks.
Cut the 6-strip sets to this desired length,
adding 1/2" for your seam allowance.

Sew the 6-strip sets in between your blocks and
continue with this process until your top is complete.

I love this quilt top and I'm sure someone very special will enjoy it :)
Please see the QUILTING PROCESS HERE.
Check out these awesome patterns:
Canadian Heart Quilt
Split Triangle Rows
(made with HSTs)
San Tan Valley Sunset
(made with 2 1/2" strips and odd blocks)

Double Option Stars - Easy Strip Quilting Technique!
(made with 2 1/2" strips)

How to Apply a Quilt Border
(even if you know how).

Super idea! People are always giving me extra blocks along with scraps for the comfort quilts I make. I need to put them out on the floor and try this. Thanks!!!
ReplyDeleteThank you Linda! I always enjoy your comments.
ReplyDeleteJust the inspiration i needed to use some "collected" jelly rolls!!!! Thank You for the wonderful idea! Hugs, GB
ReplyDeleteJust the inspiration i needed to use some "collected" jelly rolls!!!! Thank You for the wonderful idea! Hugs, GB
ReplyDeleteThank you Barbara! I have another version of this with recycled jeans that you might also like: http://quiltersenjoycolor.blogspot.ca/2014/03/denim-country-quilt.html
DeleteI tried my first strip quilt top this week and after I had sewn about half my top together realized that I was creating an arc instead of a rectangle. What am I doing wrong?
ReplyDeleteHi Charlotte, I'm glad you asked because this can happen with repeated long seams that are done side-to-side. You aren't doing anything wrong. There is an easy fix. Alternate your seams, sewing one from top-to-bottom, then the next bottom-to-top.
DeleteI love your version and I am so pleased that you shared your photo with me.
ReplyDeleteHi! I love this quilt. I do no know how to do the blocks. I am denied access to the site you gave in your response Caroline. Can you help?
ReplyDeleteHere...give this url a try. https://mypatchwork.wordpress.com/2015/10/28/quick-and-easy-doubly-striped-half-square-triangle-block/
DeleteThis link no longer works..... "2 1/2" Strip Quilting Method"
ReplyDeleteThank you. I appreciate you letting me know. 😊Melanie
Delete