This post updated February 26, 2023 for the Aunty & Annie Blog Re-Visit.
Please note: Before sewing this quilt, it is very important that you have an accurate 1/4" seam allowance set on your machine.
"3 & 8 Quilt"
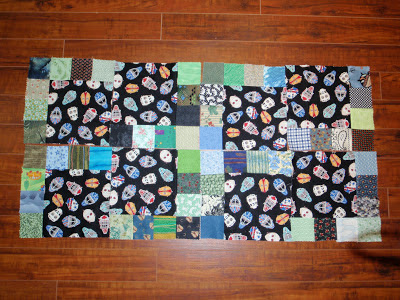
A friend gave me a big bag of 3" squares and I wanted to figure out what to do with them. I divided the 3" squares into warm and cool colors, then combined the cool colored squares with this sports print
Here is my design using
3" small squares and an 8" large square, with a 1/4" seam allowance.
3 - 3" squares sewn together and attached to one side of the 8" square.
Turn this edge to the top of the block.
4 - 3" squares sewn to the right side of the block.
Here are a few layout options.
This is what I will go with.

You will love this easy and accurate binding join!


Please Like "Quilters Enjoy Color" on Facebook to be notified of new blog posts. I will be publishing 2 new Strip Quilt patterns soon.
ReplyDeleteWhy is this called 11 patch scrap quilt?
ReplyDeleteI called it 3 & 8 because of the dimensions of the cut squares for the blocks. I guess FQ just added that together. I hope you enjoy the quilt just the same :) I am posting a new block today that you may also like. It is a simple strip pieced block inspired by my recent vacation in Japan.
ReplyDeleteVery cute and quick, would be a great stash buster too, thanks :)
ReplyDeleteIf you make this quilt I would love to see your photo on my Facebook page! Please post at https://www.facebook.com/QuiltersEnjoyColor
ReplyDeleteWow! that is a cool quilt. my mind is already thinking which scraps to use. But it will have to wait as I MUST finish my UFO's first as we will be moving this year. I definitely will keep this pattern on file. Thanks for sharing. Happy Quilting :)
ReplyDeleteThis was made for my son who is a goaltender. This top is at the quilter right now, so I will post an updated photo soon.
ReplyDeleteThank you for sharing these wonderful patterns. Hope I make at least one of them soon.
ReplyDeleteI finally finished the quilt top I started (in March 2014) using this pattern and showed by sister-in-law for her Birthday and she loves it. I just have to get it quilted now!
ReplyDeleteThat's super - great accomplishment!
DeleteI am having a go at this quilt but I have changed the larger squares to funky skeletons and I am using different coloured camouflage material for the smaller squares. I hope it turns out ok! The close up of your quilt is amazing. Beautiful workmanship.
ReplyDeleteSounds cool - have fun!
ReplyDeleteGracias por su explicacion, es muy precisa,muchas bendiciones reciba
ReplyDeleteThank you so much!
Delete