Monday 31 October 2016

Fabulous Fish Art Quilt Workshop - Calgary, AB.


I attended such a fun workshop last weekend put on by the Alberta Quilt Study Society.  The class was taught by Margaret Jessop who was the Quilter of Distinction at Calgary's  Heritage Park Festival of Quilts in May 2016.   Margaret is a wonderful person and a fun teacher.  We all had a great day learning from her, enjoying her artistic talent and her fun casual teaching style.  I learned so many new things and am ready to persue this collage quilting style in my sewing and art.

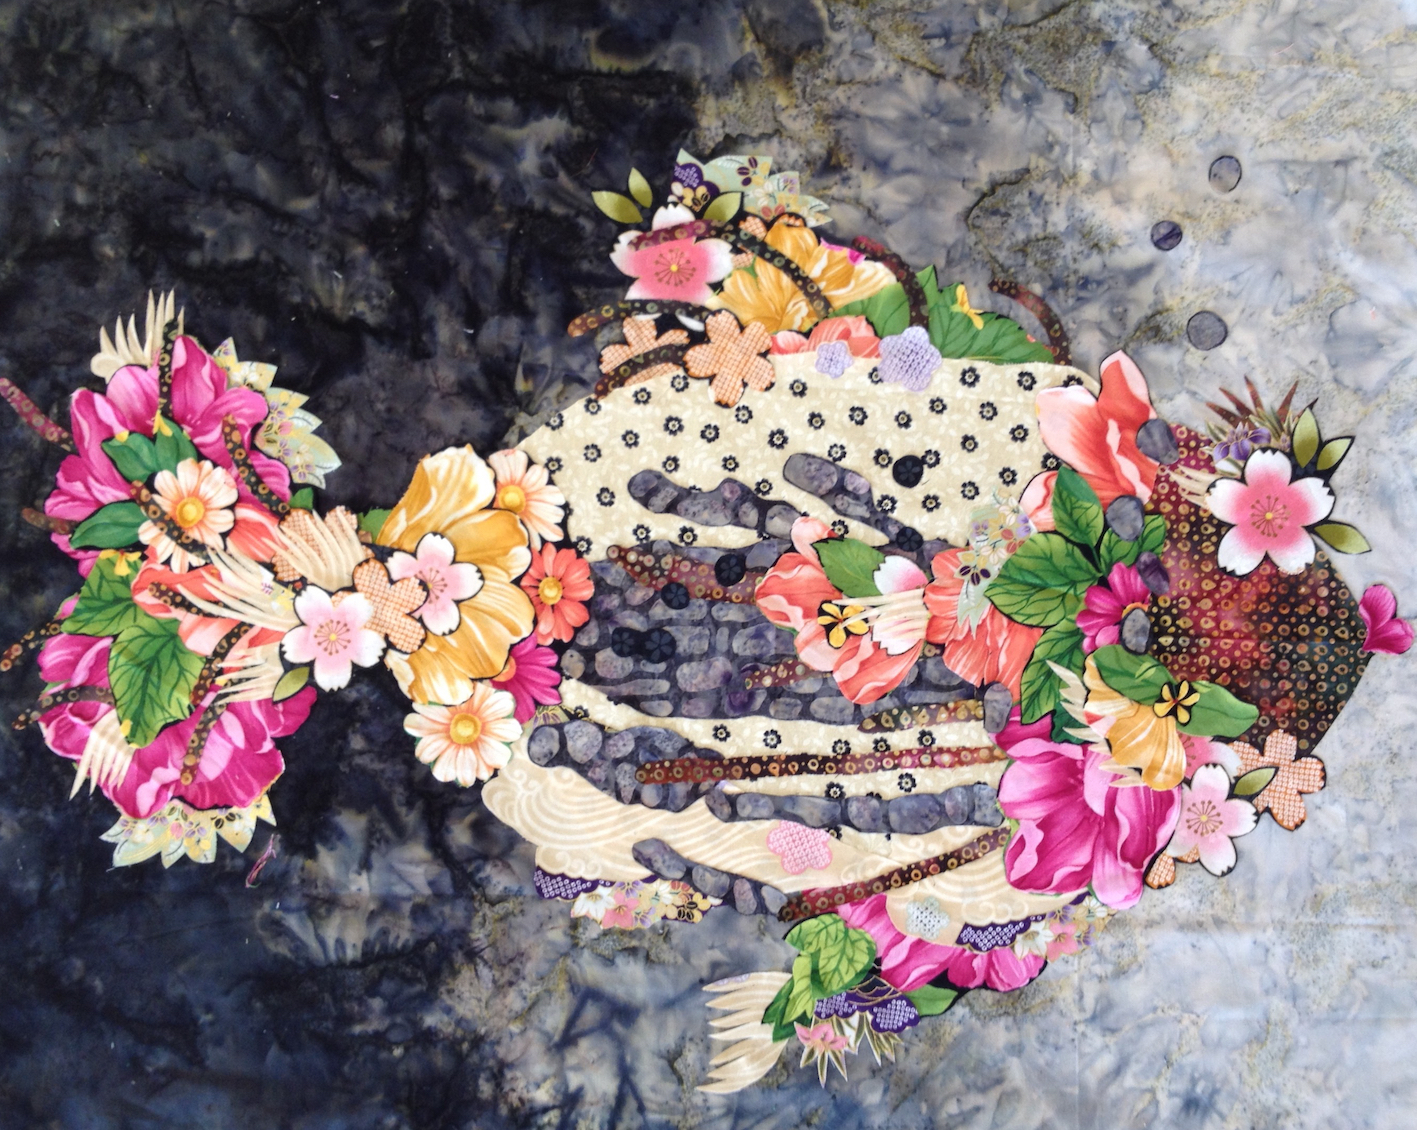
 The fish collage in progress. 

 Eye and lips details. 

 Tail detail.  The tulle is now applied to hold the collage together.  

Free Motion Quilting Progress. 

 Head detail after quilting.  

 Tail and wavy lines background details.  

Complete except for binding. 
Approx. 24 x 40"

Wednesday 26 October 2016

Baked Pumpkin Pudding with Coconut Milk (df, nf)


I love pumpkin pudding and had to do a few experimental tries (flops, failures...perfect!) to get this one right.  Substituting coconut milk for the traditional evaporated milk created the challenge.  Coconut milk is naturally sweet, requiring less sugar to go alongside it.  I experimented with sweetness and texture until I got it right.  This delicious recipe can also be used as a pie filling for those of you who like the crust.  This has been family tested and approved.  Cheers!


Dry Ingredients:
1/2 cup brown sugar
1/2 tsp salt
1 1/2 tsps cinnamon
1/2 tsp ginger
1/2 tsp nutmeg
2 Tbsps flour
1 Tbsp cornstarch

Wet Ingredients:
1 1/2 cups canned pumpkin
1 2/3 cup (1 can) coconut milk
2 eggs or 1 duck egg
I prefer duck eggs for sensitivity reasons.


Directions:

Mix all dry ingredients.
Blend all wet ingredients with a mixer.
Combine wet and dry ingredients and mix until smooth.


FOR BAKED PUDDING:
Pour into a greased 9" pie plate or equivalent sized pan.   Bake at 350F for 50-60 minutes, until knife poked in centre comes clean.


FOR PIE:
Pour filling into an unbaked 9" pie crust.  Bake at 425F for 15 minutes, then 350F for 35 minutes, until knife poked in centre comes clean.


Tuesday 18 October 2016

Teetering Christmas Tree Block

Another exciting Split Triangle Row pattern! 

Using this method make Split Triangle Rows for your Teetering Christmas Trees.


 For this pattern you will require 
2 pairs of green and cream HSTs (made from 5" squares). 


 Split your rows like this.  
Use this tutorial as a guide. 


 Cut:
2 - 5" x 13" cream rectangles.
1 - 1 1/2" x 13" brown strip. 
 
You may notice that the cream rectangles in my photos are smaller than I am directing.  I would have preferred them larger for trimming later.  


Sew the cream and brown pieces together.

Cut them into random sized rectangles like this. 
Oh geez...I should have taken 2 photos!


Alternate the Split Triangle Rows 
and the rectangle strips to make trees. 
 

Sew together and trim.

This odd-block setting would make a fantastic Christmas Quilt 
with the Teetering Trees.    

This content is provided free to you with lovely sponsorship and affiliate ads.  

 Please kindly take a peek at the sidebar for quilty and knitty connections.   


More tutorials:


Monday 17 October 2016

Oatmeal Muffins with Saskatoon Berries (df,ef,nf)


Preheat oven to 400F.


Dry Ingredients:
1 1/4 cups Flour
1 cup Oatmeal
1/4 cup Brown Sugar
3 tsps Baking Powder
1/2 tsp Salt
1/2 tsp Cinnamon

Wet Ingredients:
1 Banana
2 Tbsps Molasses
1/4 cup Canola Oil
1 cup Coconut Milk
1 tsp. Vanilla

Fruit:
1 cup Saskatoon Berries (or any berries, fruit or raisins)
(So sorry if you don't have Saskatoon berries.  These are a wonderful Canadian thing.)


Mix dry ingredients.

Combine wet ingredients.  Add to dry ingredients and don't mix very much (only until everything is moistened).

Fold in your berries.  

12 Large Muffins.


Bake at 400F for 20 minutes.

 
 Yummy! 

Helpful Note: Bananas make an excellent egg substitute in baking.


 This is the coconut milk I use for baking.  


Here are a couple of my popular quilting tutorials:


Friday 9 September 2016

Split Triangle Row Quilt (Step 2)


 Please start here at Step 1 to produce your Split Triangle Rows,
using 96 HST blocks. 


To create the layout as described here you will require setting rectangles.

Cut:
2 - 2  1/4" x 8 1/2" background fabric.
7 - 4" x 8 1/2" background fabric.


Using your setting rectangles, layout and construct your top as in the following photos.  


This is long and narrow (approximately 27" x 54") and will be used as a table topper.  I will add 5" borders once my sewing room is back in order from water damage this summer :( 

The finished top will be 37" x 64".


Here are a few more posts that you may enjoy:


Tuesday 16 August 2016

Split Triangle Row Quilt (Step 1)


Materials:
2 brightly colored Charm Packs or equivalent fabric cut into 5" squares.
2 neutral colored Charm Packs or equivalent fabric cut into 5" squares.


Using this tutorial, Making Half Square Triangles (Even If You Know How), make 48 HST blocks (4 1/2") for a small baby quilt or 96 HST blocks (4 1/2") for a lap quilt.  Each block will require one light and one dark 5" Charm Square.

 Organize your HSTs into sets of pairs with 
coordinating colors facing each other.  

Chain piece the pairs, remembering to keep the colored sides together.  

Press.  


 Organizing your blocks as you desire, 
sew 3 of the sets together to make a row. 

Press.


Now, here is the fun part!
 Line your rows vertically on your cutting mat 
and cut them in half lengthwise.  
 Each half will be 2 1/4" wide.
 Rearrange your strips like this.  

 Or mix up the colors like this.  


Play around with the strips to create these pattern options. 


This content is provided free to you with lovely sponsorship and affiliate ads.  

 Please kindly take a peek at the sidebar for quilty and knitty connections.   


Please find Step 2 here.