Saturday, 31 October 2015

Denim Triangle Bag with Lining


  Isn't this just the cutest bag?   
I love the recycled denim incorporating the pockets.


+AP16
Start by breaking your jeans down into full lengths.  Trim off the waistband and hem.  Trim off the thick seams. This bag can be made with 1 pair of jeans, but I have used 2 pairs to have variety in color.  You will require 2 pant legs with the back pockets and a bit of extra denim from the front of the pants. 


Square up the pant legs to have long rectangle pieces of denim.  Mine were 10" x 35" each.  Sew 2 legs together, alternating the pockets.  It is important to have a pocket at each end.  Add 2 extra strips of denim (one to the top and one to the bottom of your pant legs) to make a length of 47".  


The final dimensions of the denim panel are 19 1/2" x 47"
with a pocket at each end. 


+AP16

Trim your denim panel to 19" x 44". 

Cut a piece of lining fabric 19" x 44". 


Pin the lining to the denim panel and stitch together all the way around using a 5/8" seam allowance leaving an opening for turning.  Keep the opening towards one end near the pocket.  

Tip: Mark using 2 pins at each end of your opening to easily see as you sew. 


Trim corners and turn right-side-out. 

Press the edges all the way around the panel and press the opening edges under.  It is not necessary to sew this together as it will get caught in a seam of the bag. 


Pin mark 15" from each end on THE POCKET SIDE.
This will be the fold line for your seam. 


Fold your panel right-sides together and sew 
ON THE POCKET SIDE ONLY
with a 1/4" seam allowance.  

Note:  You are only sewing on one side of the panel
where the pocket is. 


Now turn up 15" at the other end of the panel.   Sew right-sides-together with a 1/4" seam allowance ON THE POCKET SIDE ONLY.  This side is a bit awkward to sew as your triangle bag develops. 


Turn your bag right-sides-out and you have an awesome bag!
Isn't it fun? 


I'm getting ahead of myself :)  There is one more step...

Lap the top corners of the bag over each other 
and sew together with a small square of stitching. 


+AP16


Please enjoy this and many other projects on my blog.  

This content is provided free to you with lovely sponsorship and affiliate ads.  

Please kindly take a peek at the sidebar for quilty connections.    
 
Please click here for a lightweight and smaller version, 
http://quiltersenjoycolor.blogspot.com/2019/10/triangle-project-bag.html 


http://quiltersenjoycolor.blogspot.com/2019/10/triangle-project-bag.html


Please see the right side bar 
at the top of this page 
for my most popular posts.  


Tuesday, 20 October 2015

The "Wildflower Improvise" is Complete!


I love this quilt and am so pleased to have it finished!   I have had an amazing and busy summer and fall enjoying the outdoors and traveling in Canada and Europe.  I decided to spend this year saying "yes" to as many adventures as possible.   This included bike rides in Calgary, Kelowna, Germany, and Austria!  It has been wonderful these past few weeks to re-group in my studio, looking forward to my next travel time. 

Now complete is the Wildflower Improvise Quilt.

These photos contains details of the Free Motion Quilting  that  I did throughout this quilt top.  In this project I focused on one design that I call the "Lollipop" as it compliments the floral theme of the Wildflower Block


 For this project I used a  Pieced Batting.

Here is an edge detail with a binding join that I have developed called My 3 Pin Binding Method.
This method creates a perfect and accurate join everytime!


I hope you enjoy these techniques and are having a wonderful autumn season,
                                                                                                                      Melanie


Wednesday, 19 August 2015

Piecing Batting with a Wide Zig-Zag


 Often I have good pieces of quilt batting left and I like to piece them together to use in another project.  This is a quick and simple method that produces a good, strong join. 

Start with numerous pieces of the same type of batting.  
For this tutorial I had 4 pieces of various widths that were at least 70" long.  

My first step was to cut all of my batting pieces 70" long.  
This length for your batting will depend on the pieces that you have.  
They need to be cut to the same length, or added onto 
(using the method described here) to make the same length.


 Trim the edges of your batting pieces so they have a clean edge.  
The widths may vary from piece to piece,  just be sure that they are squared up.  


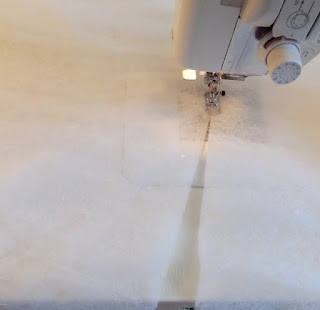
 Now, butt your pieces of batting edge to edge.  
Do not overlap.  
The batting is thick enough that it will sit nicely with the edges together. 
Pin at the beginning, middle, and end of the seam line to keep it even.  


 Keeping the edges pushed together, sew along the join line with a very wide zig-zag.  
The stitch here is 7mm wide.   

Here is a completed join.
 
When I go to pin my quilt I am able to use this as I would any brand new piece of batting.  

This piece is large enough for a lap quilt.  

I am going to use it for my  

 Happy Quilting Everyone!